Tuesday, July 21, 2009

Summer at last!

I haven't written in a while, I apologize! We have finally had some sunshine here in Farm-town. A lot has happened since the last time I wrote. The biggest news is that I have 3 new sheep! Their names are Ramona, Amelia, and Beatrix. They are Corriedales, a mom and 2 babies. The two lambs have black spots on their noses, feet, knees, ears and the tops of their heads! So sweet! I got them so that they would eat grass, poop, and grow nice clean wool!

Here is a picture of them. Ramona, the mother is the big one with the white nose looking right at us. Bea is hiding in the background, and Amelia, as always, is in the front.


I still have a lot to learn about raising sheep. I need to trim Ramonas hoofs soon, but first I need to learn how to flip her over on her rear end. Bruce at Guinea Ridge Farm where I bought them made it look so easy! I still haven't done it successfully. Those 150 lb. creatures can push me around just as easily as I can push them around! They are very gentle animals, and I haven't felt nervous around them at all. They are very friendly and Baaaaa every time they see us. They seem very happy in their new home.


As for the gardens, ours are full of weeds. It's okay, because they are being held at bay more and more with every day of sunshine that we have. It is so nice to finally get out into the gardens. Yesterday we spend the afternoon weeding potatoes and picking potato beetles. Potato beetles are very easy to take care of. We just put some alcohol in an old glass jar, and knock the beetles and plump larvae off the leaves into the alcohol.

Here are some All Blue Potato flowers, I think that they are really beautiful!


The new veggies that we have available are cabbage!! Carrots, bunching onions, peas (FIRST COME FIRST SERVE, SO ORDER YOURS SOON!!), lots and lots of basil and parsley. As always, we have salad greens. The summer squash was looking sad in that mud puddle, but is drying out, and hopefully we will have some ready to harvest soon. Last year we were harvesting squash July 13th. This year we're a little late! Cukes are not too far behind. Tomatoes are starting to blush, but are not quite there yet.
Here is a recipe that I love! This will turn you on to cabbage if you think that you're not a fan. Use purple cabbage, and it makes a beautiful side dish, good for any occasion!
Baked Cabbage with Garlic
The Mediterranean Vegan Kitchen
Makes 4 servings

Ingredients:
1 Small Cabbage – outer leaves removed, cored, and quartered
1 ½ Tbl. Extra Virgin Olive Oil
2 Cloves Garlic
¼ Cup vegetable broth
Salt and pepper to taste

Directions:
Preheat the oven to 425F. Lightly oil a deep-sided baking dish.

Fill a medium stockpot or saucepan large enough to hold a 9 inch steaming basket with 1 inch of water. Place the steaming basket in the pot and add the cabbage. Bring to a boil over high heat. Cover tightly, reduce the heat to medium, and steam until softened but not limp, 7 to 10 minutes. Carefully transfer the cabbage to prepared dish; set aside.

In a small saucepan, heat the oil over medium-low heat. Add the garlic and cook, stirring, for 2 minutes. Spoon the oil mixture evenly over the cabbage quarters. Add the broth to the dish and season the cabbage with salt and pepper. Cover the dish tightly with a lid or foil. Bake for about 20 minutes, or until the cabbage is tender through the center when pierced with the tip of a sharp knife. Serve hot, with the cooking liquid spooned over each portion. Enjoy!!

Per serving:
101 Calories
5g Protein
6g Fat
1g Saturated Fat
0mg Cholesterol
10g Carbohydrates
5g Dietary Fiber
128mg Sodium
Thanks for reading, and eat well!!

Saturday, July 4, 2009

Still raining? That's okay becasue we're jamming!

Okay, it is STILL raining!! This is week five of nothing but rain. Thank goodness for the 2 hours of sunshine that we got for our 4th of July BBQ. Hopefully this rain is not wreaking havoc on your garden! Blight can become a big problem when it is so wet.
This is a picture of this years blight that I found in the MOFGA news letter.


It seems that this year in particular there is a very nasty case of blight going around. If you see any signs of slimy, moldy, black spots on any leaves, stems or fruit, immediately pull up the plant without touching any plants around it, put it in a trash bag, throw it in the garbage (NOT the compost) and wash your hands! There is little you can do to prevent blight in this kind of weather, but it is a good rule of thumb to try to stay out of the garden when it is wet... if at all possible!
On the agenda today was to put up some Strawberry Jam! One of the benefits of farming is that there is always something to eat. To ensure that we eat during the winter, we do a lot of canning, drying and freezing of fruits and vegetables. I thought I would give a canning primer using strawberry jam since it is so darn easy!


Here is a picture of some of the items you should have ready before you begin.


Look for an aluminum canner at any farm store, or even Renys (if you're in Maine). I bought one that would just fit pint jars because it was cheaper... I wish I had the bigger one now! Wide mouth quart jars would be perfect for pickled beets and canned whole tomatoes.


From left to right, the items are, plenty of clean towels, more clean jars then you think you will need, new jar lids, a canner with a basket, jar tongs and a magnetic wand. The thing that I am missing in this picture is a jar funnel. You can get the tongs, wand and funnel in a package together just about anywhere you can get jars. Also you will need the screw bands for the jar lids.


Tips for successful jamming!


Read through the instructions carefully. I use the recipe that I find in the box of pectin, but you can use whatever recipe you want. Just make sure that you follow a recipe. My favorite canning book is Ball Complete Book of Home Preserving by Judi Kingry and Lauren Devine. You can find it on Amazon.com for about $15. It has all kinds of unique hot water bath canning recipes.


After reading the recipe and instructions carefully, get all of the equipment and ingredients that you will need together before you start. This will make jamming so much easier.


Start with a very clean kitchen, because when you are done jamming, your kitchen will be sticky mess with lots of big sticky dishes and rags piled up. You will just get frustrated if there is extra stuff in the way.


Measure all of your ingredients out EXACTLY. If the measurements are not exact, your jam will not "set up". This means that you will have strawberry sauce rather than strawberry jam. It happens to us all at one point or another.


Keep some butter and a clean knife handy. If your jam starts to get to foamy at any point, stir a little dab of butter into the hot jam mixture, the foaming will subside. This is the same trick that people use when boiling down sap to make maple syrup in the spring... pretty clever!


Always sanitize more jars than you think you will need. It is such a pain to realize that you need another jar when you're almost done!


Strawberry Jam


This recipe would be most helpful for first time canners. You probably don't need all of this info if you are an avid canner. I have lots of pretty pictures, but for some reason they won't load, so I will have to try again later...
This recipe makes about 8 cups of Strawberry Jam.

Ingredients:

2.5 quarts strawberries

7 cups of sugar

1 package of powdered pectin such as "Sure Jell"


Thoroughly wash and destem the strawberries. Cut off any soft parts of the berries.


To sanitize the jars, fill the canner about 3/4 full of water. Cover and bring to a boil over high heat. Using the jar tongs, place 10 half pint jelly jars into the water, cover, and let the water boil for 1 to 5 minutes.


Use tongs to carefully lift the jars from the water, place upside down on clean towel and set aside until ready to use. You can use a dishwasher to sanitize your jars instead of boiling them. Just run them through the dishwasher ahead of time, leave them in the dishwasher until you're ready to use them. If you do this, you will want to fill the canner about 3/4 full of water, cover and bring to a boil. Remove from heat. leave the cover on, and move to the back of the stove where it won't be spilled. This way the water is hot when you are ready to begin canning.


Mash the strawberries 1 cup at a time using a potato masher. Measure EXACTLY 5 cups of berries using a measuring cup made for wet ingredients into a large pot. Set aside. Put the excess strawberries in the refrigerator. Using a measuring cup for dry ingredients, measure EXACTLY 7 cups of sugar, using the straight edge of the back of a knife to scrape off the extra sugar in the measuring cup, into a bowl. Set aside.


Pour the package of pectin into the strawberries and stir. Heat the strawberries over high heat until they come to a rolling boil (the point when the liquid continues to boil when stirred). (Be ready with the butter, because if you need it, this step is usually the time) Add the pre-measured sugar to the strawberries and quickly stir it in. Bring the strawberry mixture back to a rolling boil, and let boil for exactly 1 minute, stirring the whole time. Remove from heat. Ladle off any foam into a bowl, set aside to use later as your first taste test!


Put a small saucepan on the stove with water in it. Place your new lids and the screw bands in the water and bring to a boil. Once they are boiling, set on a hot pad next to your clean jars. Have a clean towel, and your funnel, magnetic wand, and jar tongs handy. Clean up any clutter that has accumulated over the course of cooking the jam, now you're going to start canning your hot jam.


Turn over the first jar, place the funnel over the jar, and ladle the hot jam into the jar, filling to within 1/8th of an inch to the top of the jar. This is called "head space". Flip over your next empty jar, set the funnel on it, set aside. Dip the corner of a clean towel or paper towel into the hot water with the lids in it. Wring it out and use it to wipe the rim of your jar. Using the magnetic wand, take out one lid, dry the rubber gasket on the lid with your clean towel and place it on top of the jar. Screw on the screw bands until "finger-tip tight" or as tight as you can using only your fingertips. Continue filling jars using this method until all of the jam is gone.


Fill your teapot with water and start to boil so you will have extra water if you need it. Also have a mug near by so you can ladle excess boiling water out of the canner if you need to. You can set the rack to an elevated level by setting the indented hooks on the handles over the edge of the canner. Place the jars on the rack, and slowly lower them into the hot water. You need to have 1-2 inches of water over the tops of the jars. This is where the boiling water or the mug comes in. (If you don't need them, make yourself a cup of tea and have some toast and jam while your jam is processing!)


Cover and bring to a boil. Let boil on medium high for 10 minutes. Don't start the timer until the water is boiling.


Carefully lift the rack out of the water, and set to the elevated level. Use the jar tongs to lift each jar out of the water. Set jars on a clean towel about an inch apart from one another. Start boiling the next batch if needed. You will hear the lids start to "PING!" as the seals are made. Let the jars cool over night. Make sure that the lids have sealed, you can test them by pushing on the top of the lid, if it pops, you need to refrigerate that jar. Make sure to label your jam with the contents and date. You can store the jam for up to a year in your pantry.


Good luck on your next canning adventure. I hope you found my tips helpful. Please let me know if you have any good canning tips. Thanks for reading and eat well!!!


Wednesday, June 24, 2009

Keeping it All Under Control!


*To all of my gardening friends... don't let the weeds break you! You can do it!! Just keep weeding, mulching, hoeing, and don't lose hope! Even if there are a few (or even sometimes a lot of) weeds in your garden, veggies will still grow.*

I'm tired! It's been a long week, but we have been so productive! It only rained for about 20 minutes today, we got so much weeded. Monday we had some help weeding the Asparagus, and got it all done! I weeded and cultivated half of the potatoes. Andy weed-whacked around the greenhouses and gardens. We got most of the tomatoes strung up. I cleaned up the Kale beds. Ohh, it feels so good to get those things done. We are hoping that by the end of next week we will have all of the gardens cleaned up and under control... HA! I don't think that there is such a thing. Nature is always elbowing her way into my garden weather I invite her or not. I guess that's why I love my job so much.


I just thought I would update you all on how the Sandy River Farmers Market is going. The Tuesday market has been a success! On our best day we had 7 vendors. The Friday market is picking up as well. I would say the most we have had so far is 11 vendors. As the season progresses there will be more and more farmers showing up with their veggies and other goods. As of right you can find spring vegetables (greens, peas, radishes etc.), soap, beef and other meat, eggs, bread and other baked goods, potted flowers and vegetables, cut flowers, and sometimes pie.


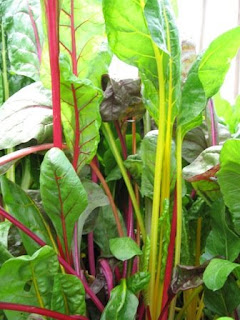
This week we will have turnips, radishes, rhubarb, swiss chard (picture above), beets, beet greens, broccoli, kale, maybe peas, eggs, bread (multi-grain, anadama, cinnamon raisin, whole wheat, oatmeal), oatmeal chocolate chip cookies, blackberry rhubarb muffins (maybe), cinnamon rolls, and maybe I'll have enough time to make another cake!


Also just a reminder that STRAWBERRY SEASON IS HERE!! It's been a really horrible start to the season for the strawberry farmers because they have a gorgeous crop, but no one will pick in the rain. The berries are rotting on the plants! The first set of berries (the king berries) is the best, so go strawberry picking soon!


Thanks for reading, EAT WELL!


Sunday, June 21, 2009

The Bees are Swarming!

Last Tuesday (I know that's a long time ago, it's been a busy week!) I was finishing up with the baking for the afternoon market, when our friends (www.4boysonly.blogspot.com) drove in and told us that "the bees are going crazy by the barn!" Weslene has one hive and it is beside the old barn just near the driveway. So we went outside to find a cluster of bees in an apple tree not far away, they were SWARMING! Here is a picture of the swarm when we first found it.


Luckily Andy had just built a bee hive, known as a "Top Bar Beehive" (to learn more about this user-friendly, very inexpensive way to keep bees, visit the Barefoot Beekeepers website at http://www.biobees.com/). A few weeks ago, Mike and Paula told us about them, and then invited us over for bee-a-palooza. At bee-a-palooza, Paula and I stayed upstairs to make lunch, talk about...well just about everything, and watch the boys, while Mike, Andy and Forrest went downstairs to build the hives (they're so crafty!). I digress...

So, we split up, I got the camera and my bee book, Andy and Forrest got the hive, and Paula stayed with the little ones. Andy got all suited up and grabbed ladders, saws, snippers, and anything else he thought we might need. He climbed up the ladder and grabbed hold of the branch with the swarm of bees on it. I climbed up the tree (the same tree with the swarm of bees on it, only I didn't have a bee suit as we could only find one!) and sawed the branch with the bees on it. Unfortunately, it was a lovely crab apple tree that Andy's grandfather had planted. Luckily, when Wes came home, she agreed that cutting the branch was the best thing to do.


After the branch was sawed off, Andy (like a champion) carried the branch to the hive, positioned the swarm, then HIT the branch so the cluster of bees fell off of the branch and into the hive! It was amazing!


When a hive swarms, it means that there are too many bees for that one hive to support, so they start raising a new queen. When she is ready, they kick out the old queen and half of the bees go with her. The cluster of bees we found were all worker bees that were protecting their queen. Each bee filled up with honey before leaving the hive, so that they could start building a new one somewhere else (this makes it really hard for them to sting, think about how fast you move after Thanksgiving Supper!). Luckily, when we tapped the swarm into the hive, the queen fell in with the rest of the bees. It seems like they like their new home in the blackberry field next to our veggies. It has been a very damp June, so we are hoping that they are able to find enough nectar to build an adequate home for themselves.
If you are in the Farmington area, you can get honey for a good price at the Sandy River Farmers Market, online at http://www.westernmainemarket.com/ or at the Better Living Center. All is local, yummy, and costs less than what you get at the super market!

Needless to say, we were very late to the Tuesday farmers market, so if you were one of those waiting for us, we apologize!

That was the excitement of our week. Other than that, it has been rainy. I've been trying to combat the weed problem in the blackberry field, but it's really hard to do in the rain, not to mention, it's not very good for the plants.

Sunday, June 14, 2009

Rain drops keep fallin' on my head!

Yet another rainy week. I really can't complain, it is making the garden (including the weeds)grow very nicely! We have taken the washed out days to work in the greenhouses, which we have been ignoring since it has warmed up. So, with the help of two of our very hard working helpers, we weeded the entire tomato greenhouse, and strung up the tomato plants.. finally!


The tomatoes are looking great! We planted about 50 different varieties of tomatoes this year. Most of those are paste tomatoes, as Andy wanted to find the BEST paste tomato out there. We planted the tomatoes under the caller ties of the greenhouse, then hung baling twine from the caller ties. We bought tomato clips from Johnnys Selected Seeds, a bag of 500 for probably $15. Well worth it! We will string up the tomatoes as they grow. In the picture above, you can see my little basil plants inte-rplanted with the tomatoes. They are doing pretty well, but they are very hard to weed around.


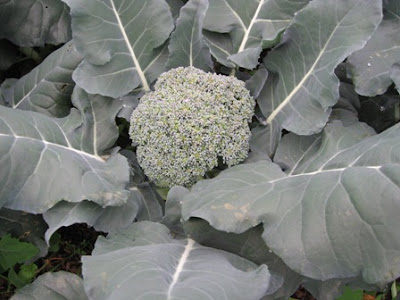
Here is one of the first baby tomatoes, it is a Juliette Roma tomato. Andy says 3 more weeks until we have the first ripe tomato... I can't wait! Until then, the broccoli in our big greenhouse is calming my cravings for crunchy, fresh summer veggies. We have about 100 broccoli plants with beautiful broccoli crowns ripening. The best part about this broccoli is that it is too early for cabbage worms, so there will be no surprises in your steamed broccoli!


In other farm news, the chickens are doing wonderfully! They are loving being outside, eating all of the bugs and grass they could ever want. Their crops are so full that they wag whenever they walk. It's pretty fun to watch them. The ducks, on the other hand, are not doing very well. I have lost all of my drakes this spring. George to a heart attack, Perchutto to a fox, and now Buddy to a very strange disease that his girlfriend now has. I have Marla and Maggie left, and they are showing signs of this disease, so I am going to put them on antibiotics, put them of fresh ground every day, and clean clean clean up after them.

Also, I am looking to start a small flock of sheep for spinning wool. I have decided on Corriedales. I can't wait to find some and get started! So if you know of anyone who has lambs or ewes to sell, let me know!

Okay, here is a broccoli recipe. It is simple enough to add to any meal, yet is original enough to really stand out in any meal! Capers taste a bit like little green olives (yum!), and are easy to find at the grocery store. Also, the recipe says to peel the broccoli stems... if you buy fresh, local broccoli, you should never have to do this!!! Enjoy!

Sicilian-Style Broccoli

The Mediterranean Vegan Kitchen

1 Head Broccoli

2 Tbl. Extra Virgin Olive Oil

2 Large Garlic Cloves, finely chopped

1/2 C. Vegetable Broth

2 Tbl. Capers, drained and crushed

1/8 tsp. Red Pepper Flakes, crushed

Salt and pepper to taste

Cut off and separate the broccoli flowers. Trim the tough ends of the stalks; peel if necessary, and cut crosswise into 3/8 inch thick slices.

In a large skillet with a lid, heat the oil over medium heat. Add the garlic and cook, stirring until golden, 1 to 2 minutes. Add the broccoli florets and stalks, vegetable broth, capers and red pepper flakes. Bring to a simmer over medium-high heat. Reduce the heat to medium-low. Cover and cook until the broccoli is tender, but still firm, 5 to 7 minutes. Uncover, increase the heat to high, and cook, tossing and stirring constantly, until any remaining broth evaporates, 1 to 2 minutes. Season with salt and pepper. Serve warm or at room temperature.

Thanks for reading and eat well!!

Wednesday, June 3, 2009

Spring Salad Greens


Salad greens are growing abundantly in the outside gardens. The weeds have been conquered in most of the bed, and it is time to harvest! We have been growing salad greens in very large quantities for 3 1/2 years now (wow!). It was the first crop that we sold wholesale and our first customer was the Homestead Bakery in Farmington. At one point we were harvesting 40-60lbs a week. It was a great way to learn the basics of farming, and to get our name out there to retail customers.

All of our best lessons learned have been from the worst mistakes made on salad greens! We learned that there is nothing more valuable to the vegetables health then the addition of amendments to the soil, it could be compost, leaves, grass clippings, chicken, horse, sheep, rabbit or cow manure. Just as long as it goes into the soil the second a crop comes out of the ground.


This year we have decided to cut back on our salad greens production and focus on other parts of the farm, such as the commercial kitchen, and the mixed vegetable garden for the CSA members and Sandy River Farmers Market. Salad greens are very labor intensive and a lot can go wrong quickly. We are having much more fun with them now that we don't feel pressured to have a lot of salad greens all of the time!


Right now we have a 100 ft. row of greens that include red and green lettuce, mild mustards, baby bok choi, kale and arugula. We harvested half of the salad greens this week, and in 2 weeks from now the same plot will be ready for harvest again.


We use sheers to cut the greens like grass by the hand full, and throw them into a bin. Once we have harvested a little bit of many different varieties of greens, we mix them, then soak them in cold water for about 10 minutes.


Then we go through the salad mix one hand full at a time looking for imperfections in greens, weeds, and whatever may have made its way into the bin. We rinse the greens twice in cold water, spin them dry in a 7 gallon salad spinner, weigh them out and bag them. It takes us about 3 hours to harvest, wash, dry, bag and clean up for 20lbs of salad.
It is now available at the Sandy River Farmers Market! But it goes very quickly, so get there early!
Thanks for reading and have a great day!!

Wednesday, May 27, 2009

Planting Potatoes

It has been a crazy week (my sister so kindly reminded me that it is only Wednesday). Andy had a freak accident on Monday (more on that later), and I have had to do all of my normal work, plus all of the work that Andy does with his right arm (he's left handed, thankfully!) But the gardens are looking great and now it is raining. We got our summer Swiss chard, beets, carrots and potatoes planted in the back garden just as it started raining this morning. It has been a slow and steady shower since.

I thought I would write about planting potatoes today, since they are so easy and fun to grow! We have a few varieties that we have fallen in love with. The varieties that we are growing this year are kennebeck, red Pontiac, la rotte (fingerling), durango red, red thumb, russet, all red, all blue, yellow finn, kyuka gold, and our favorite variety, rose finn apple (A small fingerling potato that is absolutely delicious and beautiful).

The first step in planting potatoes is to find good seed potatoes. You can use potatoes that you buy from the store, but we have had much better results and found much more interesting varieties from seed potato vendors. FEDCO has "Moose Tubers" which you can find online, but the deadline to order has passed. We buy our potatoes from a local farmer and friend, he has great varieties and we like supporting him. He does have some potatoes left so if you are interested, let me know and I will get you in contact with him.

Cut the seed potatoes if they have a lot of eyes (probably more than 6). Cut into pieces that have more than 2 eyes each.


Plant the potatoes 3-4 inches deep with the eyes facing up, 1-2 feet apart in furrows at least 2 feet apart. As the season goes on we make sure to keep the weeds down, and hill the soil around the potato plants as they grow. Potato plants are gorgeous, I think. The leaves are dark green, blue or purple, and the flowers are white or purple with bright yellow centers.

Here's a yummy potato recipe that includes kale, a green that grows in abundance this time of year, and is extremely healthy! They are potato pancakes, great served with eggs and a veggie side dish. I apologize to my vegan friends, I really need to find recipes for you too!!

Cheesy Bubble and Squeek

3 Cups mashed potatoes

8 oz. shredded kale, steamed

1 egg, scrambled

1/2 C Cheddar cheese grated

Salt and pepper to taste

Mix the potatoes and kale, egg, cheese and spices. Divide dough into 8 pieces and shape into thick patties. Cool in the refrigerator for about and hour. Toss the patties in flour. Heat a few tablespoons of oil in a frying pan until hot. Slide the patties into the oil and fry on each side for about 3 minutes or until crisp. Drain on paper towels and serve hot.

Andy is healing well after his freak accident. He was walking through the garden on a blustery day when he turned around to see a piece of steel roofing boomeranging through the air at his face. He blocked it with his arm, but it still got his nose, just a half an inch away from his eye. It was incredibly unlucky that he was right there at that moment, but it could have been so much worse then it was. Here are a few pictures of his progress. His handsome face is slowly returning to its normal size. A tech at the hospital said that this was the worst broken nose she has ever seen! Poor Andy. He's such a trooper, he hasn't even taken a day off. To all of you who have offered your support, thank you so much!! Where would we be without our wonderful friends and family?


Thanks for reading!!